今回の記事はSwift関連の記事で、MapKitで地図上のピン操作(表示・設置・移動・情報取得)を行う方法をご紹介する記事です。どれもiOSアプリで地図アプリを作成しようと考えている方は必要な操作と思われます。是非参考にしていただければ幸いです。
XcodeにMapKitを追加
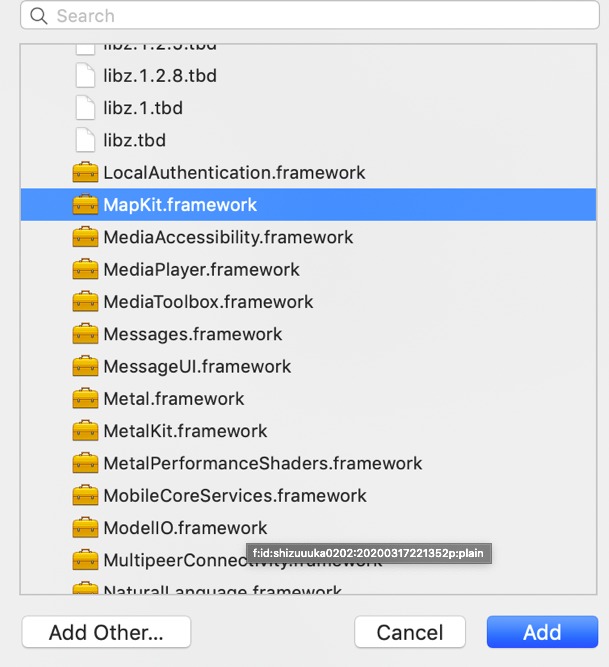
cocoapodでライブラリのインストールなどは行う必要はありません。まずは、既存のフレームワーク「MapKit.Framework」をXcodeプロジェクトに追加します。(下記図参照)
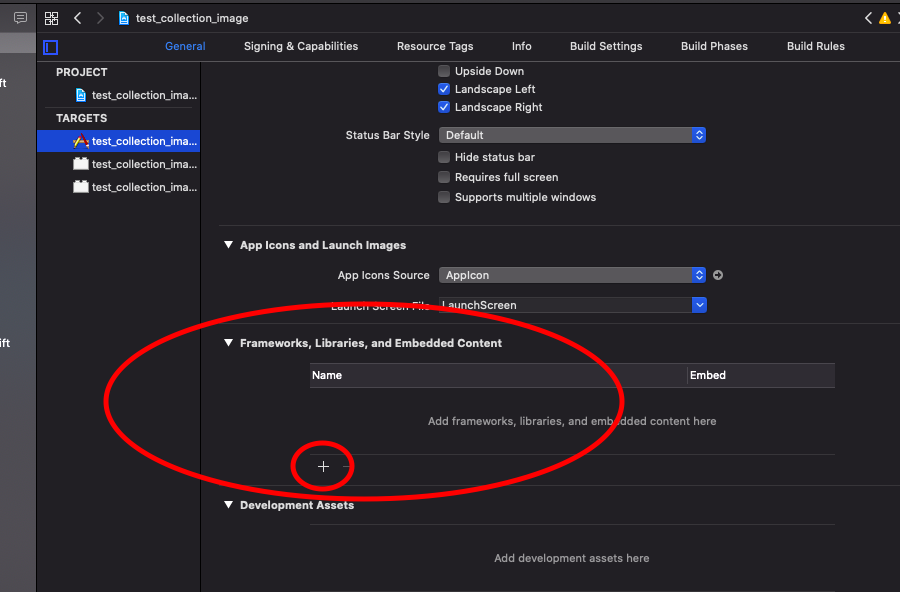
「+ボタン」を押すとXcode内に元々入っているフレームワークの一覧が表示されます。ここでMapなどで検索すれば「MapKit.Framework」が出てきますのでaddを押します。
これでMapKitがXcodeプロジェクトに追加されましたのでstoryboardでMapKitを使用していきます。
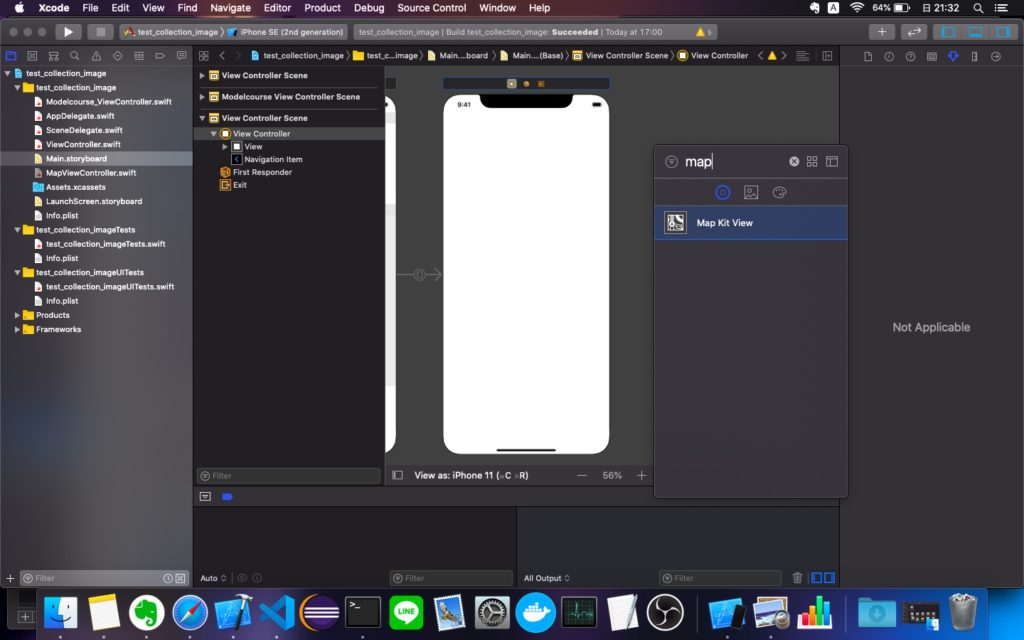
Xcodeの右上の「+ボタン」を押してMapKitViewをstoryboardに追加します。画面いっぱいに広げてみましょう。
MapKitで地図を表示
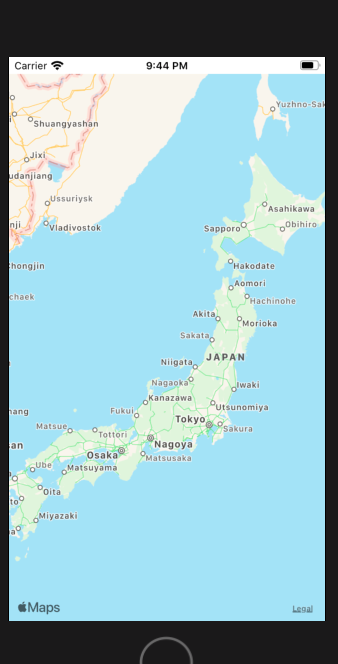
MapKitに地図を表示させるだけの場合は、特にソースコードでの実装は不要です。
この地図上で何か操作を行う場合のみソースコードでの実装が必要です。
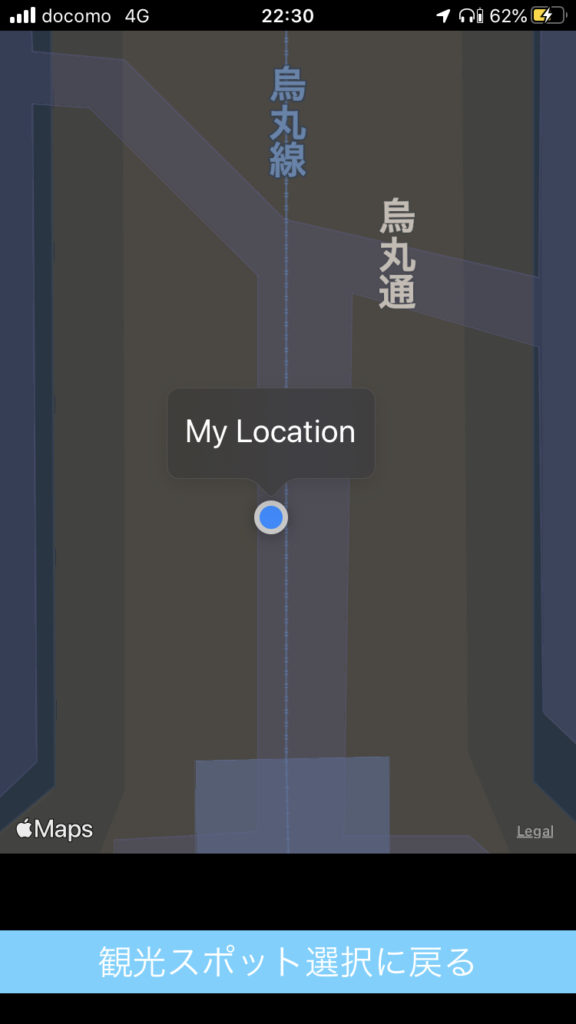
この状態でアプリをbuildすると下記のように地図を表示できます。
では現在地を表示させていきます。
MapKitで地図上にピンを表示する方法
ピンを表示するには「MKPointAnnotation」というクラスが用意されており、簡単に表示できます。実装するコードは下記です。
import UIKit
import MapKit
import CoreLocation

class MapViewController: UIViewController,CLLocationManagerDelegate,MKMapViewDelegate {
    @IBOutlet weak var map: MKMapView!

    var locationManager: CLLocationManager!

    override func viewDidLoad() {
        super.viewDidLoad()

        locationManager = CLLocationManager()
        locationManager.delegate = self
        locationManager!.requestWhenInUseAuthorization()

        let coordinate = map.userLocation.coordinate
                // ピンを生成
        let pin = MKPointAnnotation()
                // ピンのタイトル・サブタイトルをセット
        pin.title = "テストタイトル"
        pin.subtitle = "テストサブタイトル"
                // ピンに一番上で作った位置情報をセット
        pin.coordinate = coordinate
                // mapにピンを表示する
        map.addAnnotation(pin)

        map.delegate = self
        //地図にピンを立てる。
    }
    // 許可を求めるためのdelegateメソッド
    func locationManager(_ manager: CLLocationManager,didChangeAuthorization status: CLAuthorizationStatus) {
            switch status {
            // 許可されてない場合
            case .notDetermined:
            // 許可を求める
                manager.requestWhenInUseAuthorization()
            // 拒否されてる場合
            case .restricted, .denied:
                // 何もしない
                break
            // 許可されている場合
            case .authorizedAlways, .authorizedWhenInUse:
                // 現在地の取得を開始
                manager.startUpdatingLocation()
                break
            default:
                break
            }
        }
}
少し解説します。
@IBOutlet weak var map: MKMapView!まずは、MapKitViewをstoryboardに配置し、IBOutletでViewControllerに接続します。
let pin = MKPointAnnotation()
                // ピンのタイトル・サブタイトルをセット
        pin.title = "テストタイトル"
        pin.subtitle = "テストサブタイトル"
                // ピンに一番上で作った位置情報をセット
        pin.coordinate = coordinate
                // mapにピンを表示する
        map.addAnnotation(pin)

        map.delegate = self
次に上記コードの箇所でピンを地図上に表示させています。
MapKitで地図に緯度経度を指定してピンを表示
ピンを表示する場所を指定の緯度経度に設定することもできます。
import UIKit
import MapKit
import CoreLocation

class MapViewController: UIViewController,CLLocationManagerDelegate,MKMapViewDelegate {
    @IBOutlet weak var map: MKMapView!

    var locationManager: CLLocationManager!

    override func viewDidLoad() {
        super.viewDidLoad()


        locationManager = CLLocationManager()
        locationManager.delegate = self
        locationManager!.requestWhenInUseAuthorization()

        // ロケーションマネージャーのセットアップ

                // 現在地に照準を合わす


                // 指定値にピンを立てる
                // ピンを立てたい緯度・経度をセット
        let coordinate = CLLocationCoordinate2DMake(40.0, 135.0)
                // 今回は現在地ではないのでコメントアウト
        //let coordinate = map.userLocation.coordinate
                // ピンを生成
        let pin = MKPointAnnotation()
                // ピンのタイトル・サブタイトルをセット
        pin.title = "テストタイトル"
        pin.subtitle = "テストサブタイトル"
                // ピンに一番上で作った位置情報をセット
        pin.coordinate = coordinate
                // mapにピンを表示する
        map.addAnnotation(pin)

        map.delegate = self
        //地図にピンを立てる。
    }
    // 許可を求めるためのdelegateメソッド
    func locationManager(_ manager: CLLocationManager,didChangeAuthorization status: CLAuthorizationStatus) {
            switch status {
            // 許可されてない場合
            case .notDetermined:
            // 許可を求める
                manager.requestWhenInUseAuthorization()
            // 拒否されてる場合
            case .restricted, .denied:
                // 何もしない
                break
            // 許可されている場合
            case .authorizedAlways, .authorizedWhenInUse:
                // 現在地の取得を開始
                manager.startUpdatingLocation()
                break
            default:
                break
            }
        }
}
下記の実装部分が座標を指定している部分です。
let coordinate = CLLocationCoordinate2DMake(40.0, 135.0)

...

pin.coordinate = coordinate
タッチしたピンのタイトルや情報を取得する方法
タッチしたピンの情報を取得することはよくあると思います。ピンに設定したタイトルや情報を取得する実装は下記です。
import UIKit
import MapKit
import CoreLocation

class MapViewController: UIViewController,CLLocationManagerDelegate,MKMapViewDelegate {
    @IBOutlet weak var map: MKMapView!

    var locationManager: CLLocationManager!

    override func viewDidLoad() {
        super.viewDidLoad()


        locationManager = CLLocationManager()
        locationManager.delegate = self
        locationManager!.requestWhenInUseAuthorization()

        // ロケーションマネージャーのセットアップ

                // 現在地に照準を合わす


                // 指定値にピンを立てる
                // ピンを立てたい緯度・経度をセット
        let coordinate = CLLocationCoordinate2DMake(40.0, 135.0)
                // 今回は現在地ではないのでコメントアウト
        //let coordinate = map.userLocation.coordinate
                // ピンを生成
        let pin = MKPointAnnotation()
                // ピンのタイトル・サブタイトルをセット
        pin.title = "テストタイトル"
        pin.subtitle = "テストサブタイトル"
                // ピンに一番上で作った位置情報をセット
        pin.coordinate = coordinate
                // mapにピンを表示する
        map.addAnnotation(pin)

        map.delegate = self
        //地図にピンを立てる。
    }
    // 許可を求めるためのdelegateメソッド
    func locationManager(_ manager: CLLocationManager,didChangeAuthorization status: CLAuthorizationStatus) {
            switch status {
            // 許可されてない場合
            case .notDetermined:
            // 許可を求める
                manager.requestWhenInUseAuthorization()
            // 拒否されてる場合
            case .restricted, .denied:
                // 何もしない
                break
            // 許可されている場合
            case .authorizedAlways, .authorizedWhenInUse:
                // 現在地の取得を開始
                manager.startUpdatingLocation()
                break
            default:
                break
            }
        }
  func mapView(_ mapView: MKMapView, didSelect view: MKAnnotationView) {
        if let annotation = view.annotation{
            print(annotation.title!!)
            print(annotation.coordinate)
            print(annotation.title)
            print(annotation.subtitle)
        } else {
            print("no")
        }
        // タップされたピンの位置情報


    }
 }
下記のメソッドが値を取得します。
func mapView(_ mapView: MKMapView, didSelect view: MKAnnotationView) {
        if let annotation = view.annotation{
            print(annotation.title!!)
            print(annotation.coordinate)
            print(annotation.title)
            print(annotation.subtitle)
        } else {
            print("no")
        }
    }
MapKitで地図を長押ししてピンを設置
ここからはクリックした座標を取得する必要があります。画面のクリック情報を取得するためには下記設定をXcodeに追加する必要があります。Xcode右上の「+マーク」から「Long Pless gesture Recognizer」をMapKitViewに追加します。
これが長押しを検知するオブジェクトのようなものです。
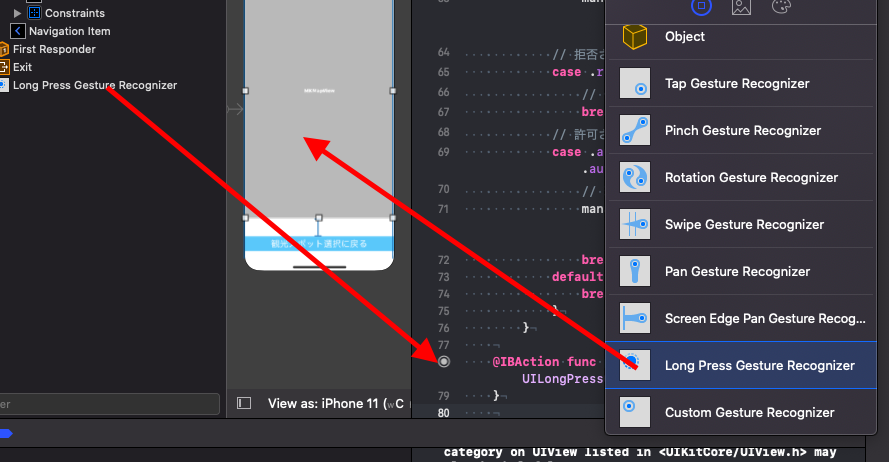
そして、上図の左側のウィンドウに追加された「Long Press Gesture Recognizer」をViewControllerにIBActionで接続します。
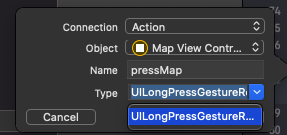
アクションは下記のように「UILongPressGestureRecognizer」を選んでください。
これで、画面の長押しの座標を取得できるようになったので、実際にMapKitで長押しの座標を取得し、その座標にピンを配置していきましょう。
import UIKit
import MapKit
import CoreLocation

class MapViewController: UIViewController,CLLocationManagerDelegate,MKMapViewDelegate {
    @IBOutlet weak var map: MKMapView!

    var locationManager: CLLocationManager!

    override func viewDidLoad() {
        super.viewDidLoad()
        locationManager = CLLocationManager()
        locationManager.delegate = self
        locationManager!.requestWhenInUseAuthorization()

        // ロケーションマネージャーのセットアップ
                // 指定値にピンを立てる
                // ピンを立てたい緯度・経度をセット
        let coordinate = CLLocationCoordinate2DMake(35.45, 139.56)
                // 今回は現在地とする
        //let coordinate = map.userLocation.coordinate
                // ピンを生成
        let pin = MKPointAnnotation()
                // ピンのタイトル・サブタイトルをセット
        pin.title = "テストタイトル"
        pin.subtitle = "テストサブタイトル"
                // ピンに一番上で作った位置情報をセット
        pin.coordinate = coordinate
                // mapにピンを表示する
        map.addAnnotation(pin)

        map.delegate = self
        //地図にピンを立てる。
    }
    // 許可を求めるためのdelegateメソッド
    func locationManager(_ manager: CLLocationManager,didChangeAuthorization status: CLAuthorizationStatus) {
            switch status {
            // 許可されてない場合
            case .notDetermined:
            // 許可を求める
                manager.requestWhenInUseAuthorization()
            // 拒否されてる場合
            case .restricted, .denied:
                // 何もしない
                break
            // 許可されている場合
            case .authorizedAlways, .authorizedWhenInUse:
                // 現在地の取得を開始
                manager.startUpdatingLocation()
                break
            default:
                break
            }
        }


    @IBAction func pressMap(_ sender: UILongPressGestureRecognizer) {

        let location:CGPoint = sender.location(in: map)

        if (sender.state == UIGestureRecognizer.State.ended){
                   //タップした位置を緯度、経度の座標に変換する。
            let mapPoint:CLLocationCoordinate2D = map.convert(location,toCoordinateFrom: map)

                   //ピンを作成してマップビューに登録する。
            let annotation = MKPointAnnotation()
            annotation.coordinate = CLLocationCoordinate2DMake(mapPoint.latitude, mapPoint.longitude)
            annotation.title = "ピン"
            annotation.subtitle = "\(annotation.coordinate.latitude), \(annotation.coordinate.longitude)"
            map.addAnnotation(annotation)
        }
    }
}
少し解説します。
今までのコードも混ざってしまっていますが、長押しでピンを設置する部分は下記箇所です。
@IBAction func pressMap(_ sender: UILongPressGestureRecognizer) {

        let location:CGPoint = sender.location(in: map)

        if (sender.state == UIGestureRecognizer.State.ended){
                   //タップした位置を緯度、経度の座標に変換する。
            let mapPoint:CLLocationCoordinate2D = map.convert(location,toCoordinateFrom: map)

                   //ピンを作成してマップビューに登録する。
            let annotation = MKPointAnnotation()
            annotation.coordinate = CLLocationCoordinate2DMake(mapPoint.latitude, mapPoint.longitude)
            annotation.title = "ピン"
            annotation.subtitle = "\(annotation.coordinate.latitude), \(annotation.coordinate.longitude)"
            map.addAnnotation(annotation)
        }
    }
MapKitで地図の設置したピンを移動
次はピンを移動させてみます。
先ほどは長押しで設置を行ったのでこの原理と同じです。
長押しした箇所ではなく画面でドラッグを行った指が最後に触れてい箇所にピンを設置すれば良いです。
import UIKit
import MapKit
import CoreLocation

class MapViewController: UIViewController,CLLocationManagerDelegate,MKMapViewDelegate {
    @IBOutlet weak var map: MKMapView!

    var locationManager: CLLocationManager!
    let annotation = MKPointAnnotation()
    override func viewDidLoad() {
        super.viewDidLoad()
        tionManager = CLLocationManager()
        locationManager.delegate = self
        locationManager!.requestWhenInUseAuthorization()

                // ピンを立てたい緯度・経度をセット
        let coordinate = CLLocationCoordinate2DMake(35.45, 139.56)
                // 今回は現在地とする
        //let coordinate = map.userLocation.coordinate
                // ピンを生成
        let pin = MKPointAnnotation()
                // ピンのタイトル・サブタイトルをセット
        pin.title = "テストタイトル"
        pin.subtitle = "テストサブタイトル"
                // ピンに一番上で作った位置情報をセット
        pin.coordinate = coordinate
                // mapにピンを表示する
        map.addAnnotation(pin)

        map.delegate = self
        //地図にピンを立てる。
    }
    // 許可を求めるためのdelegateメソッド
    func locationManager(_ manager: CLLocationManager,didChangeAuthorization status: CLAuthorizationStatus) {
            switch status {
            // 許可されてない場合
            case .notDetermined:
            // 許可を求める
                manager.requestWhenInUseAuthorization()
            // 拒否されてる場合
            case .restricted, .denied:
                // 何もしない
                break
            // 許可されている場合
            case .authorizedAlways, .authorizedWhenInUse:
                // 現在地の取得を開始
                manager.startUpdatingLocation()
                break
            default:
                break
            }
        }


    @IBAction func pressMap(_ sender: UILongPressGestureRecognizer) {

        let location:CGPoint = sender.location(in: map)

        if (sender.state == UIGestureRecognizer.State.ended){
                   //タップした位置を緯度、経度の座標に変換する。
            let mapPoint:CLLocationCoordinate2D = map.convert(location,toCoordinateFrom: map)

                   //ピンを作成してマップビューに登録する。

            annotation.coordinate = CLLocationCoordinate2DMake(mapPoint.latitude, mapPoint.longitude)
            annotation.title = "ピン"
            annotation.subtitle = "\(annotation.coordinate.latitude), \(annotation.coordinate.longitude)"
            map.addAnnotation(annotation)
        }
    }
    func mapView(_ mapView: MKMapView, viewFor annotation: MKAnnotation) -> MKAnnotationView? {

        let testView = MKPinAnnotationView(annotation: annotation, reuseIdentifier: nil)

        //吹き出しを表示可能にする。
        testView.canShowCallout = true
        return testView
    }
}
先ほどとの差はピンのオブジェクト部に当たる「let annotation = MKPointAnnotation()」をクラスの共有部で宣言し、共有して使用できるようにしております。
では長くなりましたが今回の記事は以上です。ピン操作に関してかなり網羅できたのではないでしょうか?
他にもSwift関連の記事を多数記載しているので興味あればサイト内みていってください。
コメント