今回の記事はSpringBootのcontrollerとは?という疑問に答える記事です。SpringBootはWeb開発をJavaで行う場合、非常に便利なフレームワークです。開発を行う際のディレクトリ構成やレイヤーの役割を押さえておくと開発効率的にもよいので、SpringBoot勉強中の方は是非参考にしてみてください。
また、SprtingBootの各ディレクトリ構成に関する記事や各ディレクトリの役割も別記事にまとめいているので是非参考にしてみてください。
- 【SpringBoot】ディレクトリ構成と各ディレクトリの役割ご紹介。
- 【SpringBoot】controllerとは? ←今回の記事
- 【SpringBoot】formとは?
- 【SpringBoot】dtoとは?
- 【SpringBoot】serviceとは?
- 【SpringBoot】repositoryとは?
- 【SpringBoot】mapperとは?
- 【SpringBoot】entityとは?
SpringBootにおけるcontrollerとは?
controllerとは文字で説明すると「入力に関する処理と画面描写に処理をする。」と説明している記事が多いです。
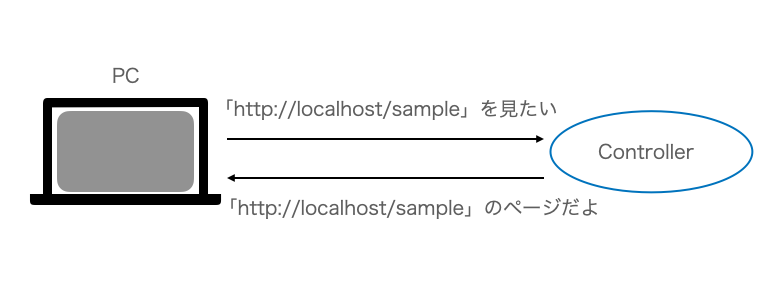
ここでいう「入力に関する処理」とはブラウザなどで、URL「http://localhost/sample」を叩いた時に、このURLに対応する処理を行うというルーティング機能です。
「画面描写に関する処理」は、入力あっての処理で、そのURLに対応する処理の最後に表示したいHTMLファイルを指定し、ブラウザの画面に表示するという処理です。
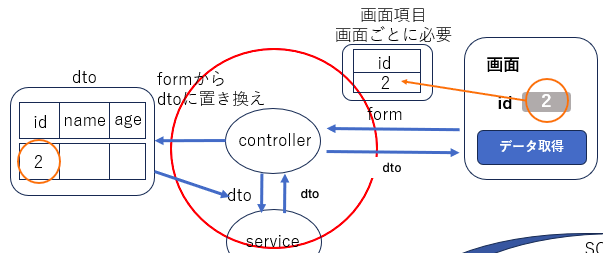
MVCでのcontrollerの動きとしては下記となります。

- SpringBootでも同じで、画面からform情報+URL情報を受け取り正しいローディングを行う。
- formからdtoへデータを変換
- serviceを呼ぶ

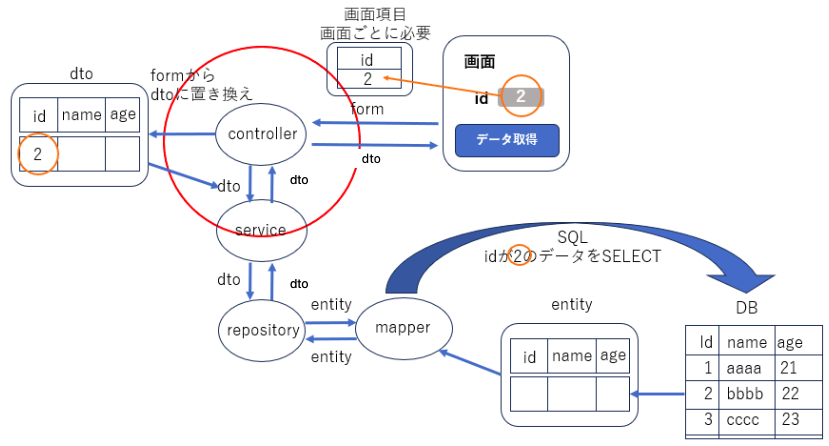
全体的な流れでいうと下記のようになります。

また、ロジックは基本的にcontrollerには実装せず、serviceに実装する必要があります。
SpringBootにおけるcontrollerの実装
実際にコードでcontrollerを表現すると下記のようになります。
package com.example.demo.controller;

import java.util.List;

import org.springframework.stereotype.Controller;
import org.springframework.ui.Model;
import org.springframework.web.bind.annotation.GetMapping;
import org.springframework.web.bind.annotation.ModelAttribute;
import org.springframework.web.bind.annotation.PostMapping;

import com.example.demo.dto.SampleDto;
import com.example.demo.form.SampleForm;
import com.example.demo.service.SampleService;

@Controller
public class SampleController {
	private SampleService service;

	public SampleController(SampleService service) {
		this.service = service;
	}

	@GetMapping("/")
	public String getList(@ModelAttribute SampleForm sampleForm,Model model) {

		// 一覧取得
		List<SampleDto> result = service.getUserList();
		model.addAttribute("sampleList",result);

		return "sampleList";

	}

	@PostMapping("/regist")
	public String registUser(@ModelAttribute SampleForm sampleForm, Model model) {

		// dtoに置き換え
		SampleDto dto = new SampleDto();
		dto.setName(sampleForm.getName());
		dto.setAge(sampleForm.getAge());

		// 登録処理
		service.registUser(dto);

		// 一覧取得
		List<SampleDto> result = service.getUserList();
		model.addAttribute("sampleList",result);

		return "sampleList";

	}
}
「GetMapping」「PostMapping」のアノテーションでURLを指定し、対象のURLでアクセスが来た場合に処理が動きます。
上記サンプルコードのpost通信ではpostデータ(form)があわせて飛んでくるくるので、dtoへ置き換え、serviceに渡すようにしています。
全体的な流れはひとつ前の章に貼った画像を参考にしてください。
さらにプロジェクト内でどのようにcontrollerが使用されているかを具体的に知りたい方は下記記事で各レポジトリの役割とサンプル的なアプリコードがありますので、そちらでcontrollerの流れを追ってみてください。
「【SpringBoot】ディレクトリ構成と各ディレクトリの役割ご紹介。」
では、今回の記事は以上です。ほかにもSpringBoot関連の記事を記載しているので、是非参考にしてみてください。

コメント