今回の記事はTypeScriptベースのReactでaxiosを使って取得したデータを、MaterialUIのdatagridに表示する方法をご紹介する内容です。初心者にも分かりやすいように記載していくので是非参考にしてみて下さい。
TypeScriptのReactプロジェクトを起動
node等がインストールされてない方はインストールして下さい。その前提で話を進めます。
npx create-react-app sample --template typescriptまずは上記で「sample」プロジェクトを作成します。
cd sample
npm start
これでローカルサーバが立ち上がって初期画面が表示できます。

axiosとMaterialUIのインストール
ではここにaxiosとMaterialUIをインストールしましょう。MaterialUIは最新バージョンで名称が変わっているので下記をインストールしましょう。「ctrl」+「c」でサーバを止めプロジェクトの中、今回で言うと「sample」プロジェクトの階層で下記を実行します。
npm install @mui/x-data-grid@next --save
npm install @mui/material @mui/styles @emotion/react @emotion/styled --save
npm install axios --save
1行目が最新バージョンのMaterialUIのDataGridをインストールしてしています。2行目がそのモジュールに必要なその他のモジュールをインストールしています。3行目はaxiosです。
MaterialUIのdatagridviewにデータ表示
まずこれでMaterialUIのdatagridviewにデータを表示してみましょう。表示方法は簡単で公式のドキュメントをコピーすれば表示できると思います。
表示できない場合は何かしらのモジュールがインストールできていないエラーが主な原因だと考えられます。
App.tsxを下記に更新して下さい。
const columns: GridColDef[] = [
  { field: 'id', headerName: 'ID', width: 90 },
  {
    field: 'firstName',
    headerName: 'First name',
    width: 150,
    editable: true,
  },
  {
    field: 'lastName',
    headerName: 'Last name',
    width: 150,
    editable: true,
  },
  {
    field: 'age',
    headerName: 'Age',
    type: 'number',
    width: 110,
    editable: true,
  },
  {
    field: 'fullName',
    headerName: 'Full name',
    description: 'This column has a value getter and is not sortable.',
    sortable: false,
    width: 160,
    valueGetter: (params: GridValueGetterParams) =>
      `${params.getValue(params.id, 'firstName') || ''} ${
        params.getValue(params.id, 'lastName') || ''
      }`,
  },
];

const rows = [
  { id: 1, lastName: 'Snow', firstName: 'Jon', age: 35 },
  { id: 2, lastName: 'Lannister', firstName: 'Cersei', age: 42 },
  { id: 3, lastName: 'Lannister', firstName: 'Jaime', age: 45 },
  { id: 4, lastName: 'Stark', firstName: 'Arya', age: 16 },
  { id: 5, lastName: 'Targaryen', firstName: 'Daenerys', age: null },
  { id: 6, lastName: 'Melisandre', firstName: null, age: 150 },
  { id: 7, lastName: 'Clifford', firstName: 'Ferrara', age: 44 },
  { id: 8, lastName: 'Frances', firstName: 'Rossini', age: 36 },
  { id: 9, lastName: 'Roxie', firstName: 'Harvey', age: 65 },
];

export default function App() {
  return (
    <div style={{ height: 400, width: '100%' }}>
      <DataGrid
        rows={rows}
        columns={columns}
        pageSize={5}
        rowsPerPageOptions={[5]}
        checkboxSelection
        disableSelectionOnClick
      />
    </div>
  );
}
これで再度ページをビルド(npm start)するとページが更新され一覧が表示できると思います。
MaterialUIの細かい解説は下記記事で解説しているのでそちらをご参照ください。
「【TypeScript】MaterialUIのdatagridviewにデータを表示する方法。」
公式ドキュメントはこちら。
ではこのMaterialUIで表示するデータをaxiosを使ってhttp通信で取得してみましょう。
axiosで取得したデータをMaterialUIのdatagridviewに表示
axiosの詳細な使い方は下記記事で解説しているのでそちらをご参考ください。
「【TypeScript】axiosでget通信・post通信を行う方法ご紹介。」
「【TypeScript】axiosを非同期で実行する方法ご紹介。」
ではコードを見ていきましょう。
import React, { useEffect } from 'react';
import { DataGrid, GridRowData } from '@mui/x-data-grid';
import axios from 'axios';
import { Box } from '@mui/system';
import { Button } from '@mui/material';

const columns = [
  { field: 'userId', headerName: 'ID', width: 90 },
  {
    field: 'id',
    headerName: 'First name',
    width: 150,
    editable: true,
  },
  {
    field: 'body',
    headerName: 'Last name',
    width: 150,
    editable: true,
  },
  {
    field: 'title',
    headerName: 'Age',
    type: 'number',
    width: 110,
    editable: true,
  },
];

//データグリッド表示用
let listcontent:GridRowData[] = [];

const App: React.VFC = () => {
  //初期表示用のからデータセット
  const [rows, setRows] = React.useState(listcontent);
  //非同期実行
  useEffect(() => {
    const GetData = async () => {
      const result = await axios(
        'https://jsonplaceholder.typicode.com/posts',
      );
      setRows(result.data);
    };
    //関数実行
    GetData();
  }, []);
  //レンダリング
  return (
    <div style={{ height: 400, width: '100%' }}>
      <DataGrid
        rows={rows}
        columns={columns}
        pageSize={5}
        rowsPerPageOptions={[5]}
        checkboxSelection
        disableSelectionOnClick
      />
    </div>
 );
}

export default App;
順番に解説していきます。
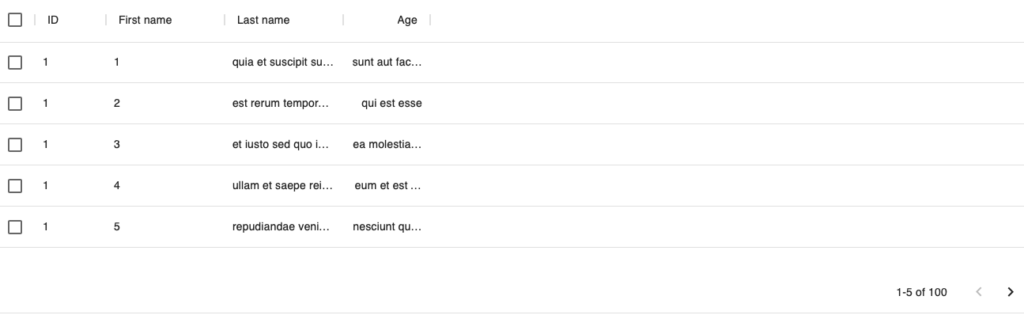
Columnの中身は自身の取得したい形に応用して下さい。今回はaxiosでの取得先はこちらの便利なJsonプレースホルダーのサイトから取得したデータを使うので下記の形で取得する前提です。
[
  {
    "userId": 1,
    "id": 1,
    "title": "sunt aut facere repellat provident occaecati excepturi optio reprehenderit",
    "body": "quia et suscipit\nsuscipit recusandae consequuntur expedita et cum\nreprehenderit molestiae ut ut quas totam\nnostrum rerum est autem sunt rem eveniet architecto"
  }
]
対応している部分は下記です。
const columns = [
  { field: 'userId', headerName: 'ID', width: 90 },
  {
    field: 'id',
    headerName: 'First name',
    width: 150,
    editable: true,
  },
  {
    field: 'body',
    headerName: 'Last name',
    width: 150,
    editable: true,
  },
  {
    field: 'title',
    headerName: 'Age',
    type: 'number',
    width: 110,
    editable: true,
  },
];
datagridでコンテンツの中身を指定できる部分は下記のrowsかcolumnsの値ですのでここを取得できる内容に変えればOKです。
<DataGrid
        rows={rows}
        columns={columns}
        ・・省略・・
      />
この「rows」にはsetStateで値を入れ込んでいます。
//非同期実行
  useEffect(() => {
    const GetData = async () => {
      const result = await axios(
        'https://jsonplaceholder.typicode.com/posts',
      );
      setRows(result.data);   //←ここ
    };
    //関数実行
    GetData();
  }, []);
あとは関数をuseeffectで非同期実行して値を取得したタイミングで再度ページを更新させているので初期の0.5秒程度は空欄のページから一覧が表示されるという流れでdatagridviewにaxiosで取得したデータを表示できます。
私もまだ分かっていないところが多いのでこの実装が最適解なのかは分かりませのでご意見あればコメントください。
では今回の記事は以上です。他にも多数のTypeScript関連の記事を記載しているので是非参考にしてみて下さい。
コメント